G and G2 Road Test Marking Sheets
G2 Road Test Marking Sheet
Crack the Code: Your Guide to the Examiner's Marking Sheet. Drive confidently with a breakdown of what to expect on your road test. Ready for success on your terms!
G2 Road Test - Marking Sheet Explanations
START
As a new driver, it’s crucial that you know your way around the safety devices in your car. You should be able to find them, know what they do, and be able to use them properly. Here’s what you need to know:
- The windshield wiper switch:
- The horn
- The lights and dimmer switches
- The turn signal switch
- The ignition switch
- The defroster switch
- The sun visors: These shield your eyes from the sun.
During your road test, the examiner may ask you to show that you know these devices and how to use them. If you can’t, it’s not a big deal, but it might make the examiner wonder if there are other parts of driving you’re not quite sure about.
Before you make any move with your car, it’s crucial to check out what’s happening around you. This means turning your head to check out the traffic and making sure your move won’t mess up anyone else’s day. Sure, mirrors can help you see what’s going on, but they shouldn’t be your only source of info. The examiner’s job is to let you decide when it’s safe to go and they won’t rush you, especially when traffic is heavy. So take your time, check your surroundings, and only move when you’re sure it’s safe.
Whenever you’re planning to change direction, it’s important to signal your intentions. This should be done whenever other traffic could be affected. Electric turn signals are typically more effective than hand signals as they allow you to keep both hands on the steering wheel. However, there are situations, like when a car is preparing to pull out, where a hand signal might be more visible to traffic approaching from behind.
The decision to stop signaling depends on the traffic conditions at the time. It’s important to remember that signals are just indicators of your intentions. They don’t give you the right to make a move. You should only proceed when you’re sure it’s safe to do so.
Driving smoothly involves proper coordination of your thoughts, hands, and feet. This is crucial for the correct operation of the clutch, brake, accelerator, gears, and steering. If you fail to operate these correctly, it will be marked as an error.
Smooth steering is one of the key aspects the examiner will be looking for during the test. To achieve this, both hands should be on the steering wheel. Different experts recommend different hand positions – 10 and 2, 9 and 3, 11 and 5, or 8 and 4, as if on a clock face.
The examiners accept all of these positions. They expect you to hold the wheel with one hand on each side, with at least a third of the wheel between your hands. Points will be deducted if your hands are too close together, if you’re holding the spokes of the steering wheel, or if you’re steering with just one hand.
BACKING
During a turnabout, also known as a 3-point turn, it’s crucial to check your surroundings repeatedly. This includes using your mirrors and physically looking to the sides and back to check for traffic while backing up. Be aware of where potential hazards may come from.
The examiner will also be observing traffic and assessing its impact on your maneuver. This maneuver is typically performed in off-street testing areas and tests your ability to turn the vehicle in a limited space.
The examiner will ask you to stop the vehicle in a suitable position and instruct you to turn the vehicle around. From that point until the maneuver is completed, you should perform without further instructions.
Smooth steering, braking, and accelerating are key to good driving. You should use the hand-over-hand technique and keep both hands on the wheel at all times in the correct position, avoiding holding onto the spokes.
The same principles that apply to starting from the curb apply here, but steering and speed become more critical. Keeping your car speed to a minimum gives you more time to perform correctly and correct any steering errors. Any speed faster than walking speed could cause difficulties and would be marked as an error.
Good coordination of your thoughts, hands, and feet is essential for the smooth and correct operation of these controls. Failure to operate them correctly will result in an error being recorded.
Smooth steering is one of the things the examiner will be looking for during the test. To achieve this, both hands should be on the steering wheel. Different experts recommend different hand positions – 10 and 2, 9 and 3, 11 and 5, or 8 and 4, as if on a clock face.
The examiners accept all of these positions. They expect you to hold the wheel with one hand on each side, with at least a third of the wheel between your hands. Points will be deducted if your hands are too close together, if you’re holding the spokes of the steering wheel, or if you’re steering with just one hand.
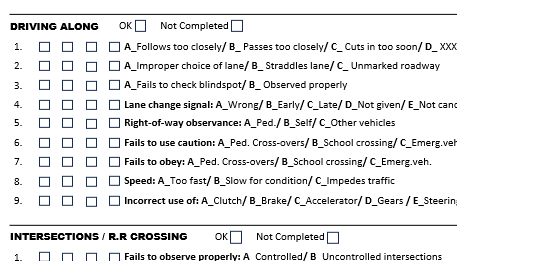
DRIVING ALONG
This point refers to the importance of maintaining a safe distance from other vehicles, pedestrians, and road users. You should avoid following other vehicles too closely in traffic, and the distance you maintain should be appropriate for the traffic conditions.
Also, be careful not to pass other road users too closely or cut in too soon after overtaking. Adjust your speed to match the traffic flow and the legal limit, ensuring you’re not driving too fast or too slow.
If you’re in the passing lane, be mindful not to force other vehicles to overtake on the right. Consistently straddling two lanes, crossing the center line, or driving left of center on an unmarked roadway is also incorrect.
Remember, most new drivers tend to drive below the legal limit and often slower than the flow of traffic. This can lead to other drivers having to reduce their speed or pass on the right, which can be dangerous. Always be aware of your surroundings and adjust your driving accordingly.
The fundamental rule for driving is that slower traffic should stay as close as possible to the right-hand side of the road. This applies to both marked and unmarked road positions. By adhering to this rule, you ensure a smoother flow of traffic and minimize the risk of accidents.
While driving, it’s crucial to constantly monitor traffic and consider how it might affect your speed and movements. You should anticipate how your actions will impact other traffic and ensure your movements align with the flow of traffic, giving other road users enough time to see and react.
Frequent brief glances in the rear-view mirror are essential to stay aware of the traffic situation behind you. You should know if there are other vehicles close behind or about to overtake you by using your mirrors.
Before changing lanes, always take the extra precaution of quickly checking over your shoulder to spot any vehicles in your blind spot. Despite the wide vision provided by modern cars, this additional check is a safe driving practice.
The examiner will be observing all traffic while the vehicle is in motion and assessing how its movements will affect your progress. Any neglect to observe or properly compensate for the movement of other traffic or sudden changes in your direction that may conflict with other vehicles will be marked.
When changing lanes, it’s important to signal in the correct direction a few moments before you make the move. This gives other drivers enough time to notice your signal. Avoid signaling too early or too late.
Remember to turn off your signal immediately after you’ve completed the lane change. While signaling is crucial, it doesn’t automatically give you the right-of-way. You should only carry out the lane change when it can be done safely and without causing inconvenience to others.
Even though the Highway Traffic Act requires signals only when other traffic is directly affected, it’s a good practice to signal all changes of direction. This helps inform other road users of your intention to change lanes. However, you should only proceed with the lane change when it can be done safely and without causing inconvenience to others. If proper instructions are given at the start of the test, you should signal all changes of direction.
- Always yield to pedestrians.
- Understand when you have the right of way and when you need to yield it to others.
- Avoid unnecessary stops when you have the right of way.
- Use caution and yield the right of way when required.
- Recognize when others yield the right of way to you and proceed accordingly.
- Always adhere to the rules laid out in the Highway Traffic Act.
Remember, the key is to balance caution with assertiveness, always prioritizing safety.
- Failing to allow free passage to pedestrians on a crossover.
- Passing another vehicle that has stopped for a pedestrian.
- Passing another vehicle within 30 meters (100 feet) of a crossover.
School crossing areas, along with school crossing guards, are common in many municipalities. The guards are authorized to stop traffic to ensure safe passage for children crossing the street. It’s every driver’s responsibility to exercise extreme caution in areas where children are crossing or frequent, such as school zones or school bus loading zones. When an emergency vehicle approaches, special precautions are required. The Highway Traffic Act requires drivers to pull over to the nearest practicable curb, bring the vehicle to a standstill, and remain there until the emergency vehicle has passed. This ensures safe and expedient passage for the emergency vehicle.
A good driver is always prepared to adjust their speed according to various conditions. This includes factors like weather, road conditions, and traffic volume. It’s important not to drive so slowly that you impede other traffic, but also not to exceed the normal speed of the traffic around you. Always aim for a speed that is safe and appropriate for the current conditions and traffic flow.
When driving, it’s important to avoid excessive lane changes and ensure smooth transitions when you do need to change lanes. Your braking and acceleration should also be smooth and considerate of other traffic.
Steering should be steady with no tendency to weave from lane to lane. If you need to brake, it should be done smoothly without any abrupt application of the brakes.
Additionally, you should be aware of when to use safety devices like the defroster or windshield wipers, and know how to operate these devices. Remember, smooth and controlled operation of all these controls is key to safe and effective driving.
INTERSECTIONS / R.R. CROSSING
Errors at intersections can lead to serious collisions, so it’s crucial to observe traffic properly. You should adjust your speed according to your ability to see traffic coming from all directions. If visibility is poor, you need to reduce your speed and exercise extra caution to observe traffic appropriately.
When visibility is unobstructed, you should carefully check traffic by looking left, then right, and then left again before proceeding. This ensures you have a comprehensive view of any cross traffic.
In addition to intersections, you should also be cautious at railroad crossings, marked by a capital ‘R’ by examiners. Errors at these locations can have serious consequences, so no errors are considered minor here. Whether at intersections with poor sight distance due to landscape, buildings, etc., or at locations with good sight distance, adjusting your speed to ensure good observation is key.
Drivers must pay attention to all road signs and signals. This includes signs used by roadside flagmen, school crossing guards, and police officers controlling traffic.
Railroad crossings have specific signals and road markings indicating where drivers should stop. After coming to a full stop, drivers may proceed if it’s safe to do so.
Pavement markings can guide drivers through intersections. These markings often take the form of lanes and arrows indicating the correct position for proceeding straight or making a turn.
It’s crucial for drivers to be constantly aware of and obey all road signs, signals, and markings. These signs and signals don’t guarantee safety on their own; safety is achieved only when all road users obey them.
At railroad crossings, the Highway Traffic Act specifies the stopping position when signals or a flagman warn of an approaching train. This position is not less than 5 meters (15 feet) from the nearest rail. Once stopped, it’s permissible to proceed if it can be done safely.
Turn lanes at intersections are often marked with arrows painted on the roadway. These arrows indicate the correct lane position for executing a turn. Good drivers should be aware of these lane markings and obey them.
When approaching intersections, it’s important to adjust your speed in a way that doesn’t disrupt the flow of traffic. Gradually slow down as you approach a stop, giving other drivers time to see that you’re stopping and adjust their own speed accordingly.
If visibility is poor, take extra precautions such as slowing down and positioning your car to maximize visibility. Slowing down too late or too quickly can confuse other drivers and potentially cause collisions, while slowing down too early can disrupt the flow of traffic.
Approach most intersections with your foot off the gas pedal and ready to brake if necessary. Intersections present a higher potential for hazards, so it’s essential to approach them at a speed suitable for the conditions. If your vision is obstructed and you can’t see cross traffic, take extra precautions to avoid conflict.
The speed you should approach an intersection at can’t be defined in exact miles per hour as it depends on the specific intersection. Generally, when you need to reduce speed, it should be lowest just before entering the first crosswalk. Your speed should be slow enough that you can stop if necessary to let pedestrians cross in front of you or to allow cross traffic to flow without hindrance.
However, you shouldn’t drive too slowly or stop prematurely as this can interfere with the normal movement of other traffic. Many drivers approach intersections too fast with the intention of slowing down or stopping, but this intention isn’t obvious to others and can cause confusion. Always approach intersections prepared to stop if necessary.
- Before crossing a clearly marked stop line.
- Before entering a crosswalk.
- Before entering the through street or highway.
It’s crucial not to block crosswalks, which are provided for pedestrian use. If you’ve stopped correctly but then have to move forward and stop again due to traffic conditions, and in doing so block the crosswalk, you won’t be penalized. Blocking intersections can occur for various reasons, some of which may be due to a lack of competence or foresight. In some cases, you might find yourself blocking an intersection due to the actions of another road user. The examiner will take all circumstances into account when scoring this aspect of your driving. Remember, it’s essential to use your judgement and foresight to avoid blocking intersections whenever possible.
The Highway Traffic Act lays down the basis for correctly giving or taking the right of way at intersections. When two vehicles approach an uncontrolled intersection at about the same time, the driver on the left should yield to the driver on the right. However, this basic rule changes when a stop or yield sign is placed on one or more of the roads at an intersection. These signs require some drivers to stop or yield the right of way to others.
Common mistakes include being overly cautious, resulting in unnecessary stops and failure to recognize their right of way when it’s yielded by others. This can often impede the normal movement of other traffic. Conversely, failing to yield or use caution can sometimes stem from a lack of understanding of this fundamental rule.
Here are some key points to remember:
- At an all-way stop, the first vehicle to stop goes first. If two vehicles stop at the same time, the one on the right goes first.
- Make eye contact with other drivers and proceed with caution.
- Always be mindful of pedestrians and yield to them as required.
- Adjust your driving based on traffic conditions and signs.
- Avoid unnecessary stops that can disrupt the flow of traffic.
- Always yield to traffic appropriately and use caution when required.
TURNS – LEFT & RIGHT
When driving, it’s important to signal your intentions clearly and in a timely manner. This could be for a lane change followed by a turn, especially on multi-lane streets or highways. While the position of your vehicle might indicate your intentions to experienced drivers, not all road users will have the same level of experience. Therefore, using signals is crucial.
The signal you give must be the correct one for your intended move. It should be given in ample time and be visible to all other road users who might be affected by your action. Remember, just signaling doesn’t automatically give you the right of way. You must ensure you have the right of way before proceeding.
After completing your maneuver, make sure your signal has turned off. Leaving your signal on can confuse other drivers about your intentions. Always be mindful of your signals and their impact on other road users.
When driving, it’s crucial to select the correct lane or position on the road for making a turn at an intersection. Pay attention to pavement markings such as lanes, arrows, and instructions, as well as overhead signs or lights.
When instructed to make a turn, you should immediately plan to place your vehicle in the appropriate lane or position for the turn. On multi-lane streets, it’s essential to select the correct lane from which to begin turning. These lanes may be marked by painted arrows or instructions on the pavement for the exclusive use of turning vehicles. Overhead signs or lights may also be used as turning lane markers.
The examiner will assess traffic conditions and give clear directions early enough for you to understand and act correctly. If an unexpected hazardous traffic situation arises, the examiner should be aware of it and, if necessary, cancel the instruction to turn and give new directions. Always be prepared to adapt to changing traffic conditions and instructions.
When making turns, there are additional considerations to keep in mind. In most situations, turning vehicles must yield. Traffic signal lights may have flashing green lights or arrows before or after the main phase. During the flashing period, the main opposing traffic streams are stopped, which is advantageous for turning vehicles. Green arrows may also appear at the same time as red lights, serving the same purpose.
In addition to vehicular traffic, you may need to consider pedestrians before entering and leaving the intersection. A common error is attempting to begin left turns in front of opposing traffic. This can result in traffic congestion because the driver has to stop to allow pedestrians to cross the street being entered, obstructing one or two lanes of traffic in the process.
Another common error is creeping far enough forward while beginning to turn left that one lane of opposing traffic is compelled to stop. On multi-lane streets, this behavior can pose a serious danger to the driver and others, as vision to the right is obstructed and the vehicle may not be visible to others coming from that direction.
A left turn from a one-way street to a one-way street is permitted on a red light, provided the driver stops first and does not interfere with pedestrian or other traffic. If an applicant does not exercise this option while on a test, the error should be noted on the score sheet.
Remember, the key is to balance caution with assertiveness, always prioritizing safety.
Right Turns:
- Start in the right-hand lane as you approach the intersection.
- Reduce your speed so you can easily stop for pedestrians and cross traffic.
- Begin to turn just after entering the first crosswalk.
- Keep as close as possible to the right curb and complete the turn as close as possible to the right-hand side.
- Be mindful of parked vehicles close to the intersection and adjust your turn accordingly.
- Avoid swinging out to the left before making a right turn as this may confuse following drivers.
Left Turns:
- Start your approach close to and on the right of the center line.
- Continue straight into the intersection until the front of your vehicle is about 4.5 meters (15 feet) from the exact center of the intersection.
- Turn the steering wheel to the left.
- Complete the turn close to and on the right of the center line of the street being entered.
- After straightening out, check the mirror and blind spot over the right shoulder, signal, and move over to the farthest right-hand lane which is clear of traffic or parked vehicles.
Wide turns usually occur when the approach is made too far to the right of the center-line or from the wrong lane, the vehicle moves too far into the intersection before beginning the turn, or the steering wheel is not turned at the correct time. Excessive speed may also be a factor in this. Always adjust your speed and position for the purpose of making a safe and correct turn.
When making turns, it’s important to follow the correct path and not cut corners or rush into the turn. Here are some guidelines for making right and left turns:
Right Turns:
- Start in the right-hand lane as you approach the intersection.
- Reduce your speed so you can easily stop for pedestrians and cross traffic.
- Begin to turn just after entering the first crosswalk.
- Keep as close as possible to the right curb and complete the turn as close as possible to the right-hand side.
Left Turns:
- Start your approach close to and on the right of the center line.
- Continue straight into the intersection until the front of your vehicle is about 4.5 meters (15 feet) from the exact center of the intersection.
- Turn the steering wheel to the left.
- Complete the turn close to and on the right of the center line of the street being entered.
- After straightening out, check the mirror and blind spot over the right shoulder, signal, and move over to the farthest right-hand lane which is clear of traffic or parked vehicles.
Cutting corners usually occurs when the approach is made too far to the left of the center-line, the vehicle doesn’t move far enough into wide intersections before beginning to turn, the steering wheel is turned too early or too quickly, or the driver rushes to make left turns in front of traffic from the opposite direction.
For left turns from a one-way street to a one-way street, the approach and completion of the turn should be close to the left-hand curb. To turn left from a one-way street to a two-way street, the approach should be close to the left-hand curb. After checking for cross traffic, drive straight into the intersection until about 4.5 meters (15 feet) before the center line, then begin to turn left. This method should enable you to complete the turn close to and on the right of the center line. To turn left from a two-way street to a one-way street, the approach to the intersection should be close to and on the right of the center line. Turn left immediately on entering the traveled portion of the street being entered and complete the turn as close as possible to the left side of the street.
Effective steering is crucial when making turns. The most commonly recommended method is the hand-over-hand technique for turning the steering wheel. Regardless of the method used, steering should be smooth and confident. You should avoid palming the steering wheel or holding or turning it by using the steering wheel spokes.
After completing a turn, it’s common to relax your grip on the steering wheel and let it spin back to the straight-ahead position while it slips through your hands. With power steering, you’ll need to turn the steering wheel back yourself to recover the vehicle from the turn.
Poor recovery is a major error and suggests that you’re oversteering out of habit. Experience and circumstances will help you determine when your steering wheel control is satisfactory. Remember, practice is key to mastering steering control and recovery.
Speed control is a critical factor when making turns. The turning movement requires careful coordination of speed and steering to maintain the correct turning arc. Drivers who are not sufficiently prepared sometimes drive too slowly in an effort to compensate for their lack of steering skill. However, driving too slowly can impede other traffic and is not advisable.
On the other hand, overconfidence or misjudgment can lead to entering or leaving a turn much too fast. Both scenarios can disrupt the flow of traffic and potentially lead to accidents.
The key is to neither drive too slowly as to impede other traffic, nor exceed the normal speed at which traffic is moving. Your speed should be well managed throughout the turn, both while starting and ending the turn. This allows for a smooth, safe turn that doesn’t interfere with other traffic. The examiner will assess your speed control during turns according to these criteria.
When making turns, it’s crucial to give full attention to potential points of conflict in the intersection. Traffic engineers have calculated that in crossing or turning at a busy intersection, the average driver has to assess and cope with over 100 potential points of conflict. Therefore, it’s common sense that such things as gear changing, signaling, and adjusting speed should be done before entering the intersection.
Driving should be done as simply and smoothly as possible. This includes the correct use of the clutch, brake, accelerator, and gears. Late braking and late gear changes, whether or not these things could have been done to a better advantage either earlier or later, will be scored by the examiner. Stalling the engine and excessive acceleration will also be scored.
Remember, the key is to eliminate as many distractions as possible before entering the intersection so that you can focus on the traffic conditions before and during the turns. Always make allowances for all traffic conditions.
PARKING
- Choosing a Spot: The examiner will instruct you when to park. Make sure to select a legal, spacious area where you can comfortably complete the maneuver.
- Observation: Constantly check your surroundings in multiple directions throughout the maneuver. This includes before you stop, while backing up, and when yielding to approaching cars.
- Positioning: Your stopping position relative to the vehicle ahead of the vacant space is crucial. Aim to be about half a meter apart and parallel.
- Backing Up: Before starting to park, check traffic in both directions. Depending on the space available and current conditions, decide whether to proceed or wait. Once you start backing up, continuously monitor your position and other vehicles that could interfere with your maneuver.
- Angling: When your vehicle reaches a 45-degree angle to the curb, steer to the left. Pay attention to the position of the left rear fender of the stationary vehicle in relation to the right side and/or front of your vehicle. Ensure there’s enough clearance to avoid contact.
- Final Adjustments: Once you’re sure of the clearance, check your distance from the curb at the rear. Then, look forward and center your vehicle in the parking space. Use your mirrors only when direct observation isn’t possible.
Remember, the focus is on demonstrating reasonable skill and knowledge of the process, rather than achieving a perfect park.
This section evaluates your ability to avoid hitting objects, other vehicles, or climbing curbs. Here’s a simplified explanation:
- Light Contact: Light contact with objects or other vehicles is usually not scored unless it happens repeatedly, indicating a lack of skill or care.
- Hard Bump: A hard bump will be scored. If it results in damage, you may be disqualified.
- Climbing Curbs: If both front and rear wheels mount a curb of normal height (6 to 8 inches) and block the sidewalk, it may be considered incompetence. On off-street testing areas, if one wheel goes over the curb, the test is usually ended.
Objects can include marker poles on off-street testing areas, lamp posts, parking meters, hydro poles, fire hydrants, and trees. If your vehicle gets stuck on a curb during off-street testing, the examiner will provide wooden wedges to the accompanying driver to help free the car from the curb.
Remember, the goal is to demonstrate skill and reasonable care in avoiding contact with objects and other vehicles, and in staying off the curb.
This section assesses your ability to position your vehicle correctly when parking. Here’s a simplified explanation:
• Spacing: Pay attention to the spacing between your car and the cars in front and behind. The spacing should be even.
• Angle: Your car should not be at an unusual angle in relation to the curb.
• Distance from Curb: Your car should not be parked more than two feet from the curb.
The examiner may use discretion in scoring this section and may ask you to attempt the maneuver again if necessary. If a second attempt is required, it’s better to try at a new location if possible. Aim to stop about 30 cm away from the curb.
Remember, the goal is to demonstrate your ability to position your vehicle correctly and safely when parking.
This section evaluates your ability to signal correctly when leaving a parking space. Here’s a simplified explanation:
• Starting Procedures: When you’re directed to leave the parking space, you must follow all the procedures of starting. This includes checking traffic and signaling appropriately.
• Signaling: Use the correct signal to indicate your intention to other road users. This is a crucial part of safe driving and is required when leaving a parking space.
Remember, the goal is to demonstrate your understanding of the correct starting procedures, including the use of signals, to ensure safe and effective driving.
This section assesses your ability to use the vehicle’s controls correctly during parking maneuvers. Here’s a simplified explanation:
- Speed: Keep your car’s speed to a minimum. This allows more time to perform the maneuver properly and correct any steering errors. Any speed faster than walking speed may create difficulties and should be scored.
- Steering: Perform parking maneuvers slowly and with controlled steering. Use hand-over-hand steering for precision.
- Control Usage: The same controls and remarks applied to starting from the curb also apply here. However, steering and speed play a more critical role in this context.
Remember, the goal is to demonstrate your ability to use the vehicle’s controls correctly and safely, maintaining a slow and controlled speed, and using precise steering during parking maneuvers.
STOP, PARK AND START ON A GRADE
Here’s a simplified explanation:
• Observation: Before moving your vehicle from a parked position, check traffic by turning your head to ensure your intended movement won’t interfere with other traffic. Use mirrors to supplement your view, but don’t rely solely on them. Move only when the way is clear.
• Signaling: Ensure your signal is on well in advance of moving. If your turn signal is obstructed by other cars, you may use a hand signal to assist. Remember, signals indicate intention only and do not give right of way.
The Highway Traffic Act requires drivers to signal all changes of direction when other traffic is likely to be affected. Electric turn signals are usually better than hand signals as they allow you to keep both hands free for steering. However, if your car is preparing to leave the curb from a row of parked cars and the left electric signal may not be seen by traffic approaching from the rear, a clearly given hand signal can provide better information for other drivers. Discontinue the hand signal depending on the traffic conditions at the time.
Remember, signals indicate intention only. They do not confer any right to the signaller who should not carry out any movement until he/she is satisfied that he/she can do so safely.
This section assesses your ability to prevent the vehicle from rolling back when parking or starting from the side of the curb. Here’s a simplified explanation:
• Parking: After bringing the vehicle to a standstill beside the curb, if it rolls back to set the wheels against the curb, a roll-back is only marked if it’s more than a reasonable distance for safety.
• Starting: When starting away from the curb or from a stop on an upgrade, the vehicle should not be allowed to roll back. If it does, a minor error is assessed for a roll-back of about one foot, and a major error if it’s more than a reasonable distance for safety.
Remember, the goal is to demonstrate control over your vehicle by preventing it from rolling back when parking or starting, ensuring safety at all times.
This section assesses your ability to angle your wheels correctly when parking on a grade and position your vehicle properly. Here’s a simplified explanation:
- Upgrade with Curb: Angle your wheels to the left and let the vehicle roll back slowly to touch the curb.
- Downgrade with Curb: Angle your wheels to the right.
- Upgrade without Curb: Angle your wheels to the right.
If the curb is high enough to prevent the car from rolling away, turn the front wheels to the left and let the car roll back slowly to set the wheels against the curb. This applies when parking on an upgrade.
If there’s no curb, or if the curb is too low to prevent the car from rolling away, or if the car is parked on a downgrade, turn the wheels to the right.
When parking on the left side of a one-way street on a downgrade, turn the wheels to the left. Similarly, when parking on the left side of a one-way street on an upgrade, turn the wheels to the right.
Remember, the goal is to demonstrate your understanding of how to angle your wheels correctly depending on the parking situation to ensure safety.
This section assesses your ability to set the parking brake and select the proper gear when parked. Here’s a simplified explanation:
• Parking Brake: The Highway Traffic Act requires all motor vehicles to have a parking brake in good working order. When you park, make sure to set the parking brake firmly in the “ON” position.
• Gear Selection: If your vehicle has an automatic transmission, place the gear selector in the park (P) position. If your vehicle has a manual transmission, place it in either reverse or first gear depending on whether you’re parked on a downgrade or an upgrade, respectively.
Remember, the goal is to demonstrate your understanding of how to secure your vehicle properly when parked to ensure safety. Once you stop your vehicle, follow this sequence: set the parking brake to the “ON” position and select the proper gear based on your vehicle’s transmission and the parking situation.
Operating a vehicle on a grade can be challenging as it requires additional attention to prevent the car from rolling backwards or in an unintended direction. Here’s a simplified explanation:
- Control Usage: The controls referred to here are the same as those mentioned in earlier maneuvers. However, starting on a grade requires more precise coordination of your mind, hands, and feet.
- Preventing Rollback: When starting on a grade, it’s crucial to manage your clutch, brake, and accelerator effectively to prevent the car from rolling backwards.
Remember, the goal is to demonstrate your ability to operate the vehicle’s controls correctly and safely, particularly when starting on a grade. This requires careful coordination and attention to prevent the car from rolling in an unintended direction.
SUMMARY REASONS FOR DISQUALIFICATION
Comments
Comments
Comments
Comments
Comments
Comments
Comments
Comments
Comments
Comments
EXAMINER COMMENTS
Comments
Comments
Comments
Comments
Comments